Set Up the Polkadot SDK Parachain Template
BeginnerIntroduction
The Polkadot SDK includes several templates designed to help you quickly start building your own blockchain. Each template offers a different level of configuration, from minimal setups to feature-rich environments, allowing you to choose the foundation that best fits your project's needs.
Among these, the Parachain Template provides a preconfigured runtime with commonly used pallets, making it an ideal starting point for most parachain development projects.
This guide walks you through the full process of working with this template. You will:
- Set up the Polkadot SDK Parachain Template.
- Understand the project structure and key components.
- Verify your template is ready for development.
- Run the parachain template locally in development mode.
By the end of this guide, you'll have a working template ready to customize and deploy as a parachain.
Prerequisites
Before getting started, ensure you have done the following:
- Completed the Install Polkadot SDK Dependencies guide and successfully installed Rust and the required packages to set up your development environment
For this tutorial series, you need to use Rust 1.86. Newer versions of the compiler may not work with this parachain template version.
Run the following commands to set up the correct Rust version:
Polkadot SDK Utility Tools
This tutorial requires two essential tools:
-
Chain spec builder: A Polkadot SDK utility for generating chain specifications. Refer to the Generate Chain Specs documentation for detailed usage.
Install it by executing the following command:
This command installs the
chain-spec-builderbinary. -
Polkadot Omni Node: A white-labeled binary, released as a part of Polkadot SDK that can act as the collator of a parachain in production, with all the related auxiliary functionalities that a normal collator node has: RPC server, archiving state, etc. Moreover, it can also run the Wasm blob of the parachain locally for testing and development.
To install it, run the following command:
This command installs the
polkadot-omni-nodebinary.
Clone the Template
The Polkadot SDK Parachain Template provides a ready-to-use development environment for building with the Polkadot SDK. Follow these steps to set up the template:
-
Clone the template repository:
-
Navigate into the project directory:
Explore the Project Structure
Before building the template, take a moment to familiarize yourself with its structure. Understanding this organization will help you navigate the codebase as you develop your parachain.
The template follows a standard Polkadot SDK project layout:
parachain-template/
├── node/              # Node implementation and client
├── pallets/           # Custom pallets for your parachain
├── runtime/           # Runtime configuration and logic
├── Cargo.toml         # Workspace configuration
└── README.md          # Documentation
Key directories explained:
- runtime/: Contains your parachain's state transition function and pallet configuration. This is where you'll define what your blockchain can do.
- node/: Houses the client implementation that runs your blockchain, handles networking, and manages the database.
- pallets/: Where you'll create custom business logic modules (pallets) for your specific use case.
- Cargo.toml: The workspace configuration that ties all components together.
Note
The runtime is compiled to WebAssembly (Wasm), enabling forkless upgrades. The node binary remains constant while the runtime can be updated on-chain.
Compile the Runtime
Now that you understand the template structure, let's compile the runtime to ensure everything is working correctly.
-
Compile the runtime:
Tip
Initial compilation may take several minutes, depending on your machine specifications. Use the
--releaseflag for improved runtime performance compared to the default--debugbuild. If you need to troubleshoot issues, the--debugbuild provides better diagnostics.For production deployments, consider using a dedicated
--profile productionflag - this can provide an additional 15-30% performance improvement over the standard--releaseprofile. -
Upon successful compilation, you should see output indicating the build was successful. The compiled runtime will be located at:
./target/release/wbuild/parachain-template-runtime/parachain_template_runtime.compact.compressed.wasm
Verify the Build
After compilation completes, verify that the runtime was created successfully by checking for the Wasm blob:
You should see the parachain_template_runtime.compact.compressed.wasm file in the output, confirming the build was successful.
Run the Node Locally
After successfully compiling your runtime, you can spin up a local chain and produce blocks. This process will start your local parachain using the Polkadot Omni Node and allow you to interact with it. You'll first need to generate a chain specification that defines your network's identity, initial connections, and genesis state, providing the foundational configuration for how your nodes connect and what initial state they agree upon.
Follow these steps to launch your node in development mode:
-
Generate the chain specification file of your parachain:
-
Start the Omni Node with the generated chain spec. You'll start it in development mode (without a relay chain config), producing and finalizing blocks:
The
--devoption does the following:- Deletes all active data (keys, blockchain database, networking information) when stopped.
- Ensures a clean working state each time you restart the node.
-
Verify that your node is running by reviewing the terminal output. You should see log messages indicating block production and finalization.
-
Confirm that your blockchain is producing new blocks by checking if the number after
finalizedis increasing in the output.
The details of the log output will be explored in a later tutorial. For now, knowing that your node is running and producing blocks is sufficient.
Interact with the Node
When running the template node, it's accessible by default at ws://localhost:9944. To interact with your node using the Polkadot.js Apps interface, follow these steps:
-
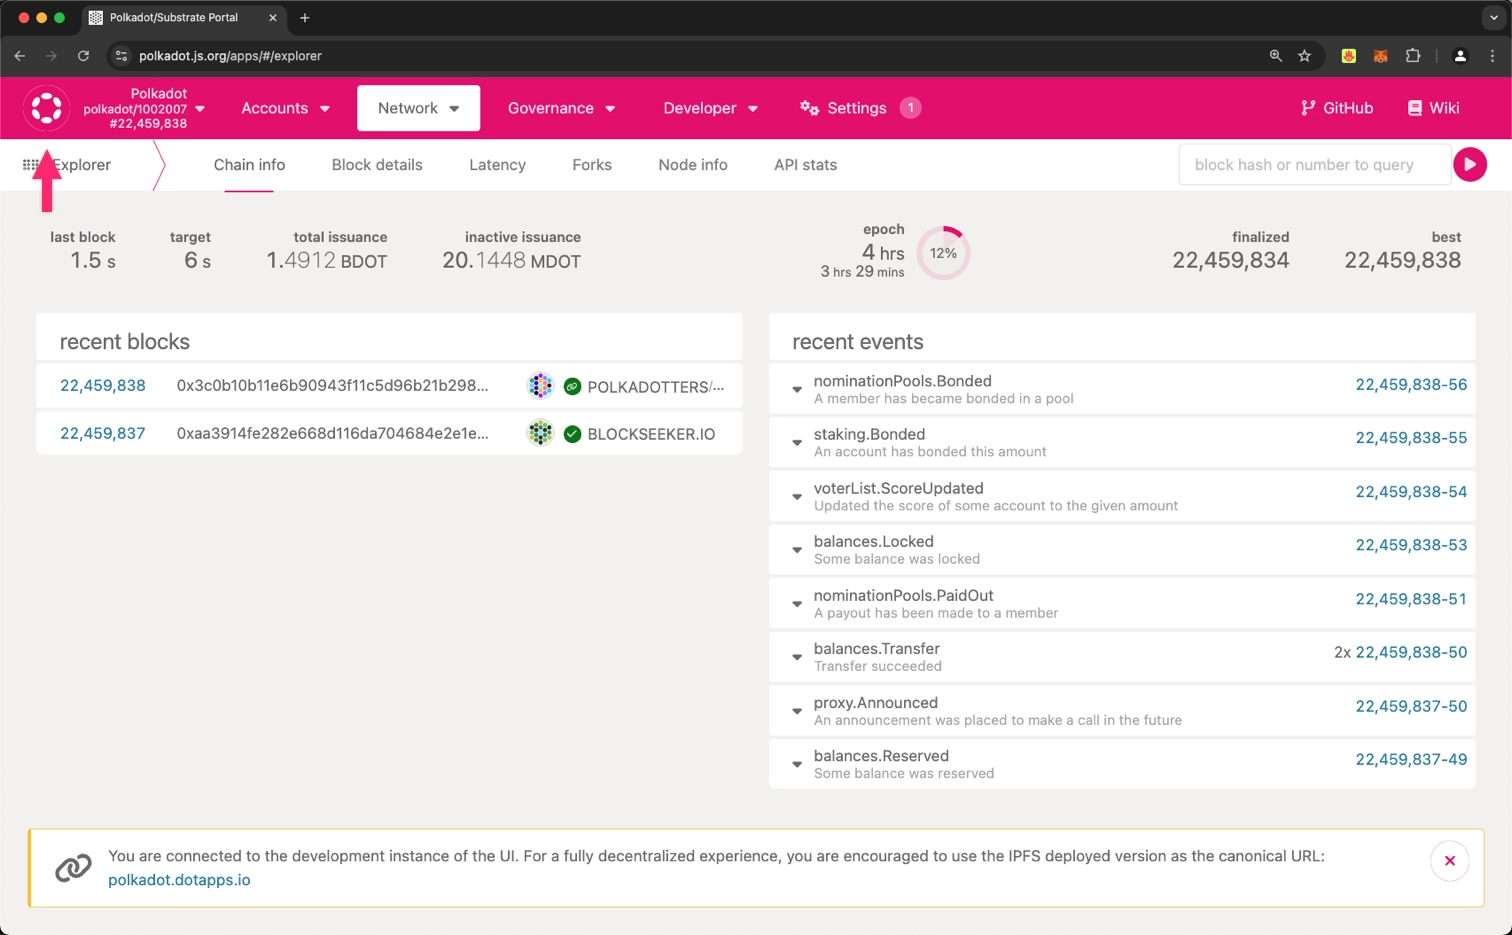
Open Polkadot.js Apps in your web browser and click the network icon (which should be the Polkadot logo) in the top left corner:
-
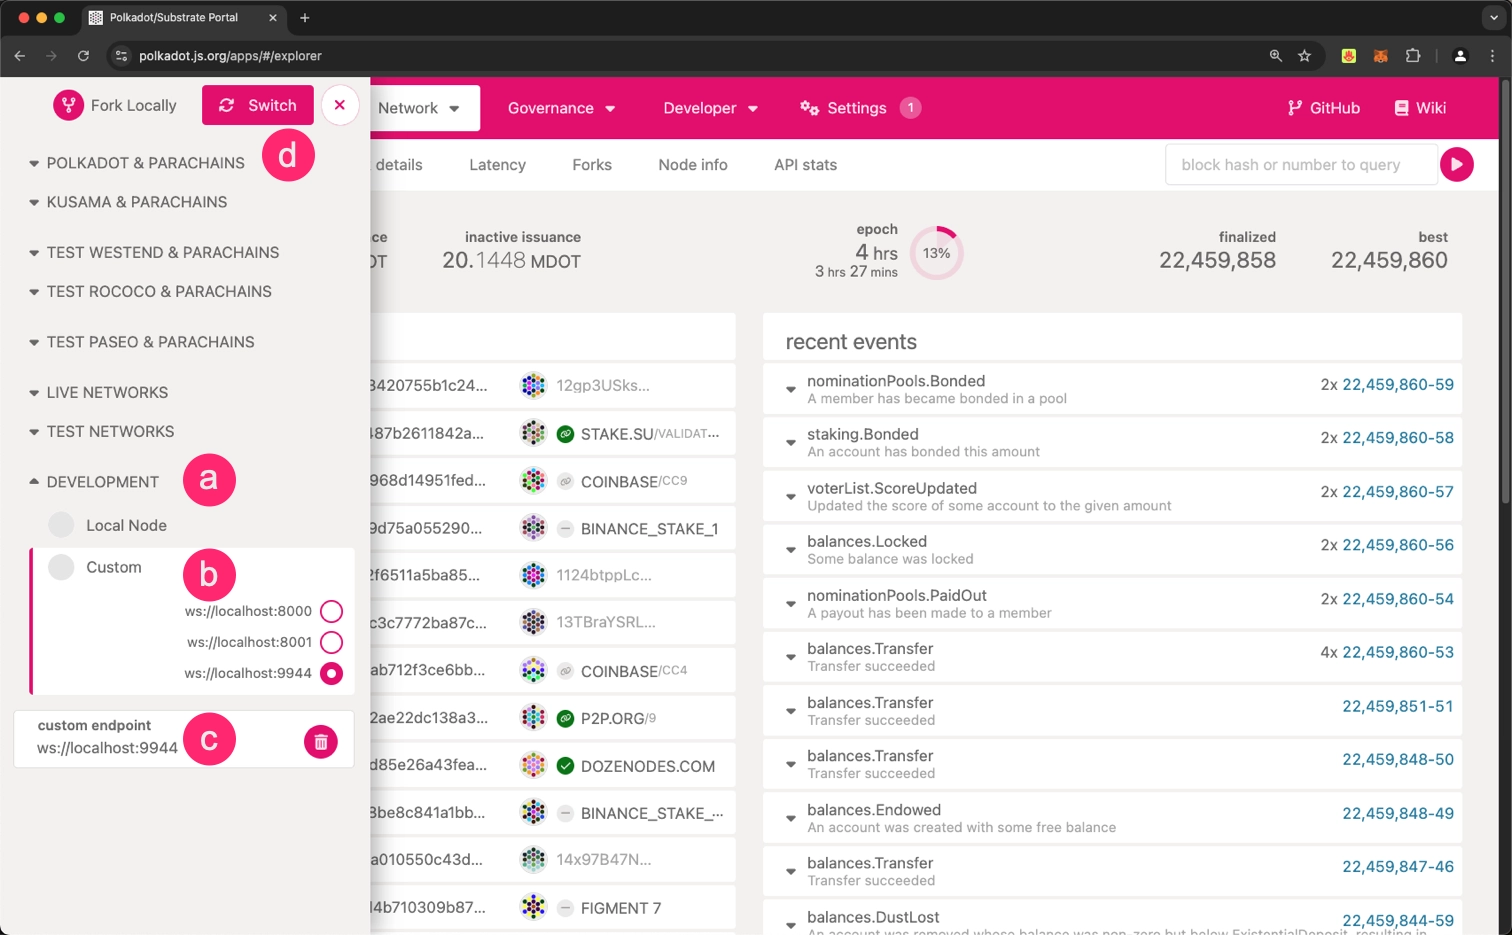
Connect to your local node:
- Scroll to the bottom and select Development.
- Choose Custom.
- Enter
ws**: //localhost:9944in the custom endpoint input field. - Click the Switch button.
-
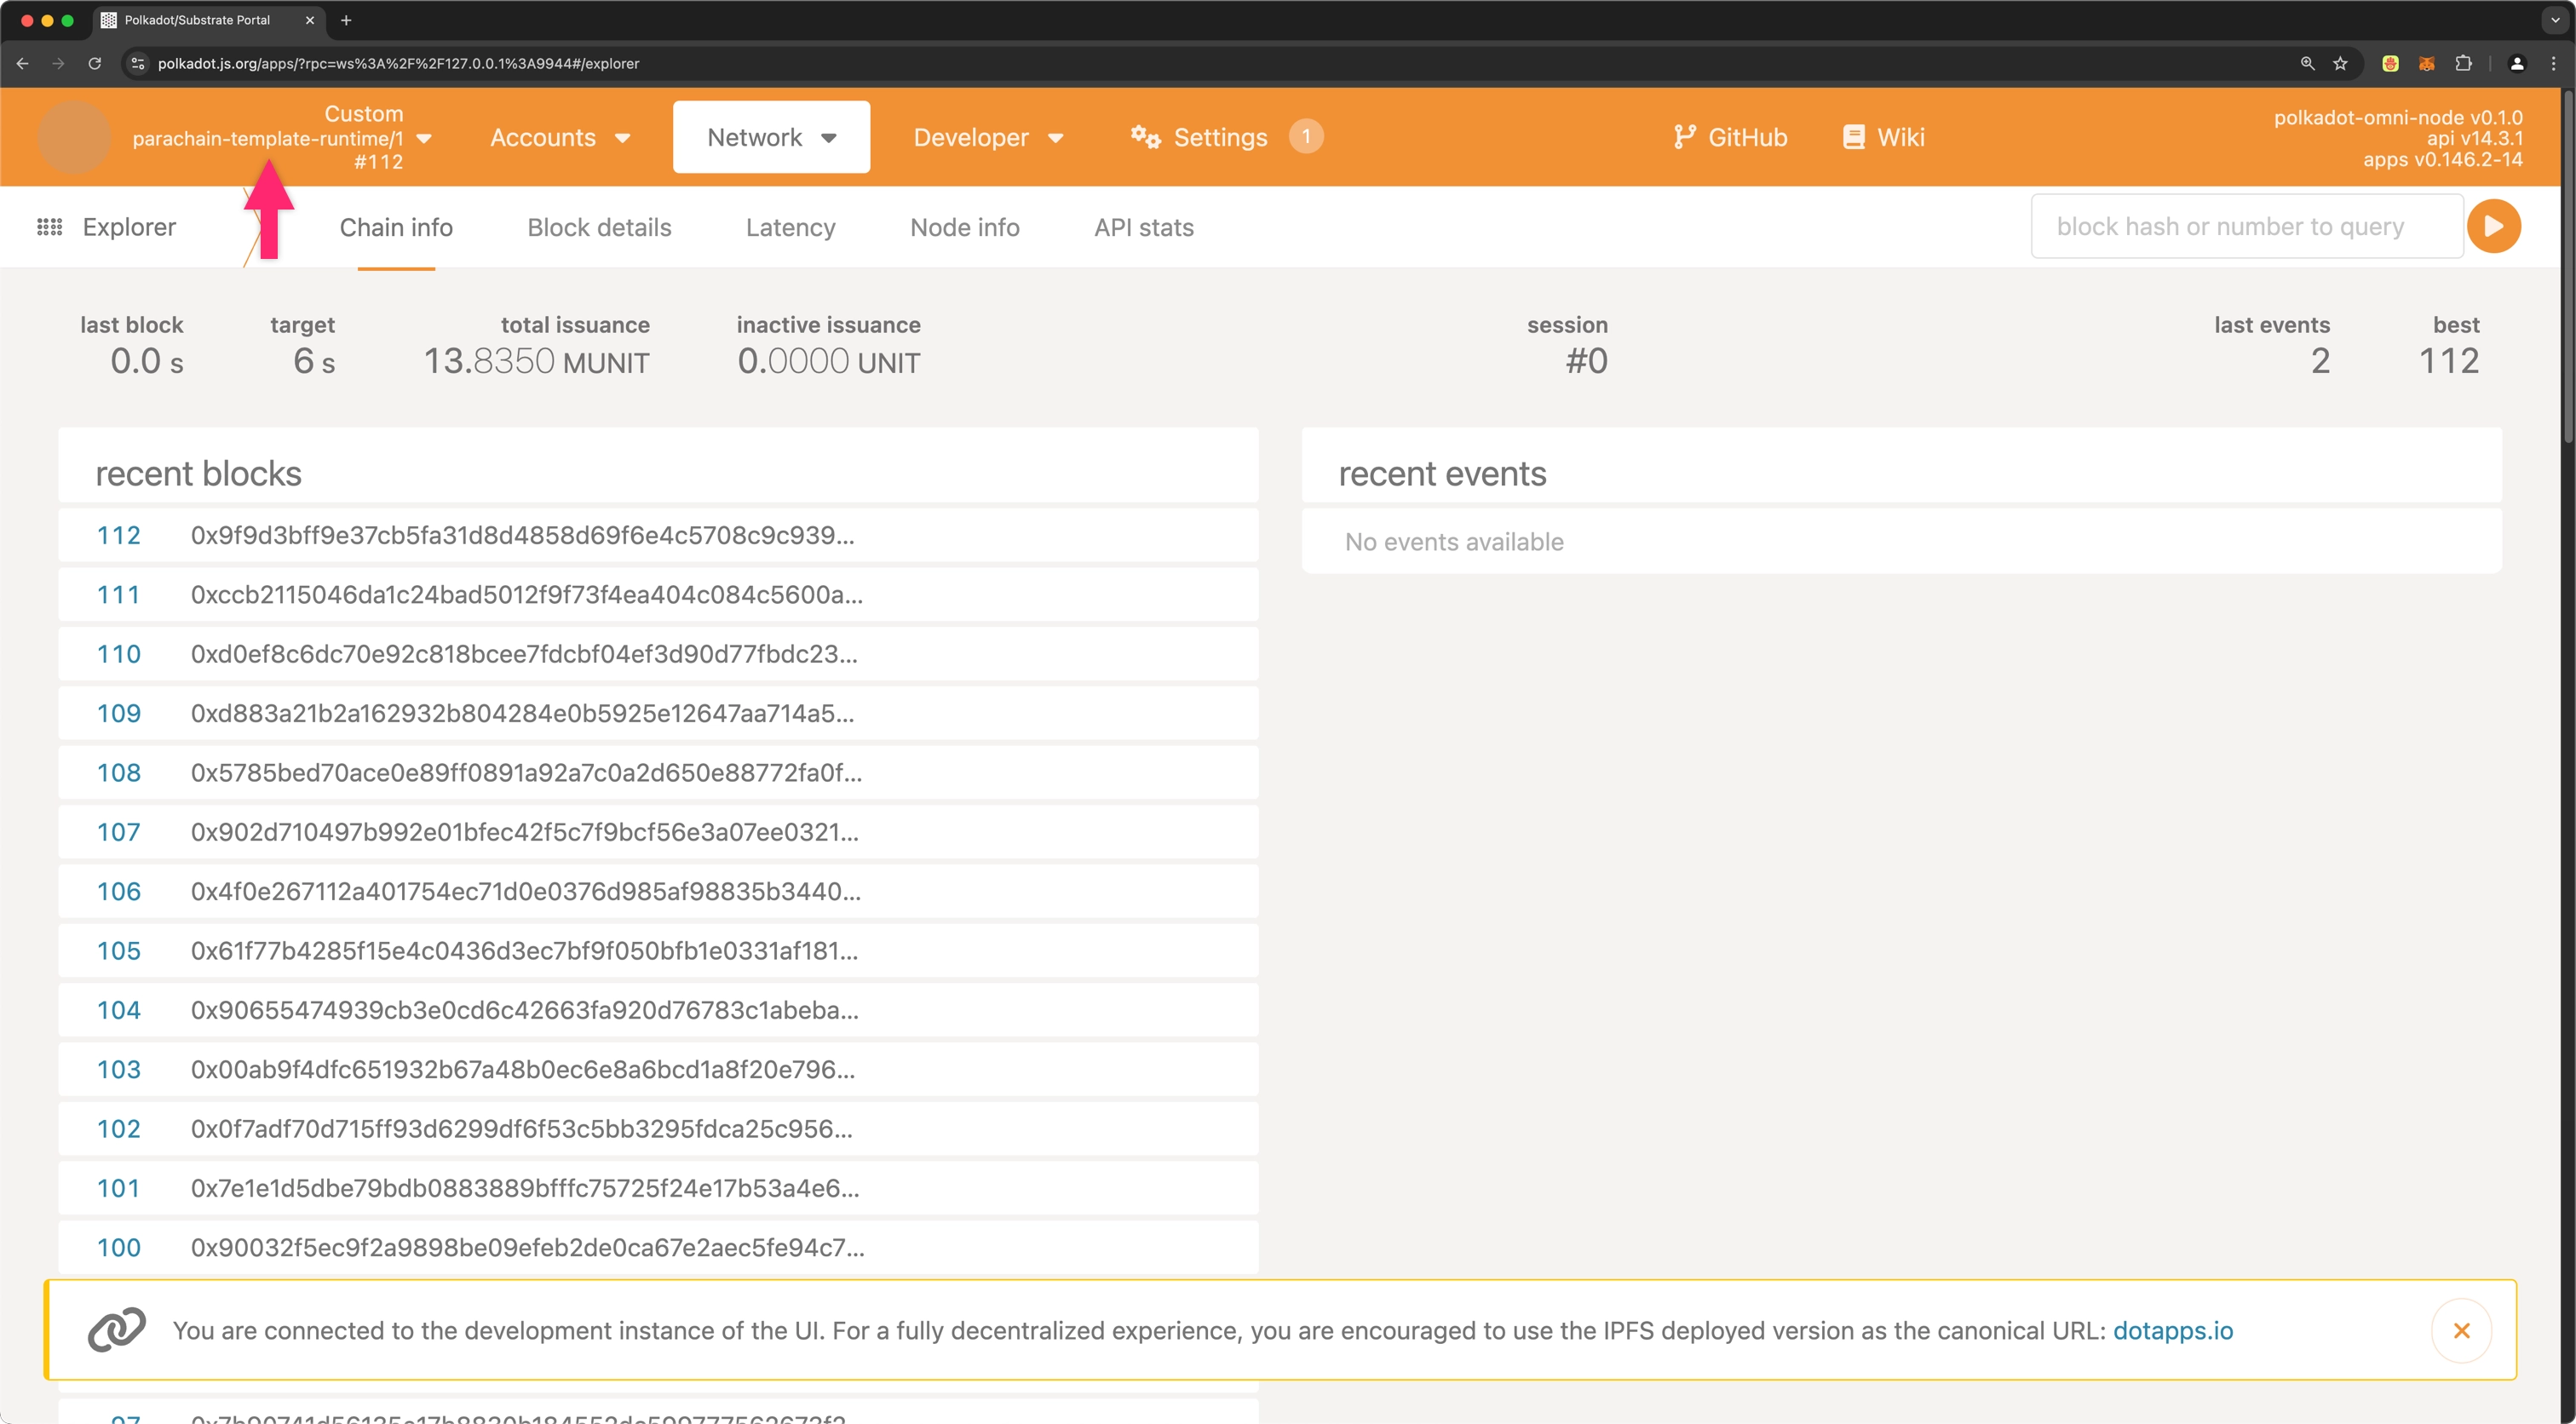
Once connected, you should see parachain-template-runtime in the top left corner, with the interface displaying information about your local blockchain.
You are now connected to your local node and can interact with it through the Polkadot.js Apps interface. This tool enables you to explore blocks, execute transactions, and interact with your blockchain's features. For in-depth guidance on using the interface effectively, refer to the Polkadot.js Guides available on the Polkadot Wiki.
Stop the Node
When you're done exploring your local node, you can stop it to remove any state changes you've made. Since you started the node with the --dev option, stopping the node will purge all persistent block data, allowing you to start fresh the next time.
To stop the local node:
- Return to the terminal window where the node output is displayed.
- Press
Control-Cto stop the running process. - Verify that your terminal returns to the prompt in the
parachain-templatedirectory.
Where to Go Next
-
Tutorial Deploy to Polkadot
Learn how to deploy your parachain template to a relay chain testnet. Configure your chain specification, register as a parachain, and start producing blocks.
| Created: October 20, 2025